Revive AdServer (Formerly OpenX Source) Conversion Tracking Tutorial
This tutorial will guide you through an initial setup of the Conversion Tracking feature provided by Revive AdServer (Formerly OpenX Source).
The conversion tracking feature consists of setting up trackers for an advertiser and then linking trackers to particular campaigns you want to track.
Example Tracker usage:
If you are a credit card company and you want to track how many applications get filled out as a result of your ads, you might want to put a tracker on the application confirmation page. Doing this will enable you to see how many ‘conversions’ resulted from people clicking on your media.
Trackers can have multiple conversion rules which enable the user to obtain detailed information regarding completed conversions. A conversion rule is the amount of time after the occurrence of a click or a view in which a conversion can be counted. For example, if you enter a click window of 30 days a conversion will be counted if a person clicks on an ad, then fills out a credit card application form within 30 days. If he or she fills out an application 31 days or later after the ad was clicked, it will not be counted.
Step 1 – Enable Conversion Tracking Feature in Global Settings
The Configuration > Global Settings > Conversion Tracking Settings allow you to manage your conversion tracking settings:
![]()
- Enable Conversion Tracking: conversion tracking is enabled by default. Deselect this checkbox if you want to disable this feature.
- Default Ad Impression Connection Window (seconds): specify the time duration allowed for the default ad impression connection window when using conversion tracking.
- Default Ad Click Connection Window (seconds): specify the time duration allowed for the default ad click connection window when you are using conversion tracking.
Following any adjustments made in this screen, don’t forget to hit Save Changes.
Step 2 – Create New Tracker
A new Tracker has to be defined for a specified Advertiser available in your Inventory. Go to Inventory > Advertisers > [Select desired Advertiser] > Trackers
Step 3 – Set New Tracker Properties
The example screen below depicts a Tracker’s initial properties.
![]()
- Name: assign the tracker a name of your choice.
- Description: this field serves as a reminder for this particular tracker.
- Conversion Type: this dropdown menu lets you choose between Sale, Lead and Signup, according to the type of conversion you want to track for this campaign. This selection does not have effect on the Tracker’s functionality.
- Default Status: the dropdown menu offers Approved, Ignore or Pending as a default status assigned to a new conversion.
Save your settings. A new Tracker has been created. Select the newly defined Tracker to edit its additional properties. Go to the Linked Campaigns tab. The tab depicts all available Campaigns for the desired Advertiser to which your Tracker can be linked.
Select a desired Campaign and confirm your changes by clicking the ‘Save Changes’ button.
Step 4 – Define Tracker Conversion Window
Your current screen shows all campaigns available for the advertiser to which this tracker can be linked.
Note: If there are no campaigns on the ‘Linked campaigns’ screen then you need to add campaigns for the advertiser first.
Select which campaigns you wish to link on this screen. Save Changes.
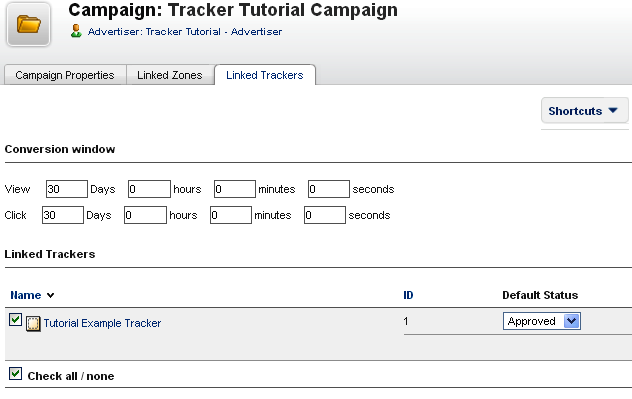
Click on the linked Campaign to access the Conversion Window settings. On the next screen you have the opportunity to modify the default click and view windows for the tracker for the specified campaign.
Note: Every Tracker needs to have a Conversion Window defined. The example screen below depicts an initial Tracker properties.

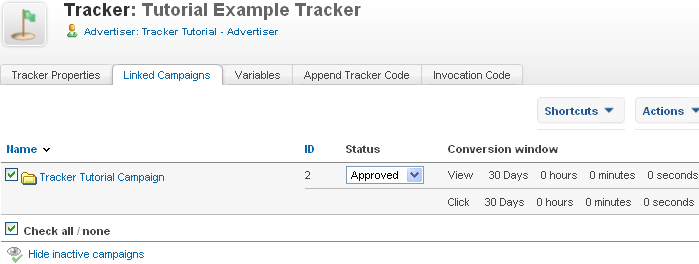
Save your changes with the ‘Save Changes’ button. Hit the ‘Back’ button on your browser to return to the ‘Linked Campaigns’ tab, then refresh your browser to see the changes made to the Tracker settings. You should have a Tracker setup similar to the one shown below:

Note: It is very important to have a Tracker Conversion Window defined and to link the new tracker to at least one campaign.
Step 5 – Define Tracker Variables (Optional)
The Variables tab allows you to log information that is unique to a specific conversion. First of all, select yourtracker type:
![]()
This selection configures the way that data is passed from the page and into the conversion. The options in the dropdown are:
- Track JavaScript variables: this setting means that the variables are set in the confirmation page as JS variables ( var = ‘Test value’; )
- Track JavaScript variables (backwards compatible, escaping needed): this setting means that the JS values must be URL encoded ( var = ‘Test%20value’; ). It is provided for backwards compatibility only.
- Track HTML elements using DOM: this setting will parse the confirmation for an HTML element with the specified name. It will take the value from that element automatically.
- Custom JS code: this setting allows you to use your own custom JS code to pass the variable’s value into the conversion.
Next, you have the option to add one or more variables:
The available fields are:
- Variable Name: the name of the variable should correspond with the type of variable you want to track.
- Description: enter a description of your choice for this variable.
- Date Type: the type of value to be passed on, i.e. String for text strings, Numeric for numeric values, Datefor specific dates. The advantage of setting the data type is that it allows the system to perform appropriate operations on the data, e.g. summing numeric values or joining strings.
- Purpose: this field tells Revive AdServer (Formerly OpenX Source) what to use this data for. If you are tracking the amount of a sale, for example, then Basket value should be selected.
- Reject if empty?: if no value is passed in for this variable, don’t use this value in calculations.
- Dedup conversions?: if enabled, Revive AdServer (Formerly OpenX Source) will use this value to de-duplicate conversions. The usual usage is to pass in a sale number, and Revive AdServer (Formerly OpenX Source) will ignore multiple conversions with the same sale number.
- Variable hidden to: hide the variable to no, some or all websites.
Once you are happy with your variables, hit Save changes.
Step 6 – Append Tracker Code (Optional)
It is possible to append any HTML code to a tracker beacon. The HTML entered here will be displayed to the user when this tracker beacon is displayed. It is possible to append multiple HTML blocks to a tracker beacon (these HTML blocks can be selectively enabled). The HTML blocks will be delivered in the order specified here.
Note: The appended code above can only be delivered when using the JavaScript tracker.
Step 7 – Tracker Invocation Code
Here is where you can collect the correct type of invocation code for your advertiser’s banners. Select Image Tag or JavaScript Tag from the dropdown and copy and paste the code that appears in the Trackercode box into your website’s source code:
![]()
The Image Invocation Code generates an html tracking beacon code.
The Javascript Invocation Tag generates JavaScript based tag.
The generated Tracker code contains the tracker variables defined in the ‘Variables’ tab. When using the Tracker code on your website it is necessary to provide the example variable ‘gender’ with an appropriate value on the ‘Thank You’ page.
Below you can see the final actions you need to take in order to properly start to track conversions on your website:
- You have your banners already delivered on your website – it is not necessary to make any changes to your existing invocation tags
- Copy the tracker invocation tag and paste it on your ‘Thank You’ page (or anywhere else where you would like to track conversions).
- Replace all %%VARIABLE_PLACEHOLDERS%% with an appropriate auto-generated value (depending on the viewer’s profile)
Step 8 – Enable Conversion Column For Statistics
Note: Revive AdServer (Formerly OpenX Source) statistics data (including conversions) is updated every 60 minutes. You will not be able to see your conversions sooner than this when performing conversion tracking tests.
Conversion Tracking statistics are available in the Statistics tab. To have them visible (as a ‘Conversions’ chart column) you need to enable the Conversions data column in User Interface Preferences. Go to My Account tab > Preferences > User Interface Preferences > [Statistics] and enable ‘Conversions’ column.
Step 9 – Conversion Tracking Statistics
Conversion Tracking statistics are available – like any other statistical data – in the Statistics tab. The basic conversion statistics are presented below:

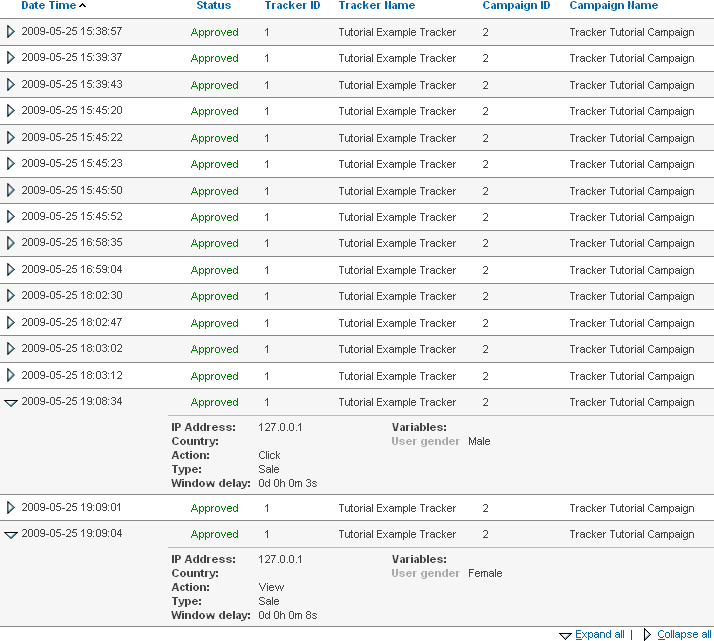
You can obtain detailed conversion tracking information for each banner by clicking on the conversion value in the Conversion column. The image below depicts a detailed conversions list for the desired banner in the defined period of time.

You can expand the selected conversion to get the most detailed conversion data information available, including: IP Address, Country, Action, Type, Window delay and defined tracker variables data.
[…] the Conversion Tracking Tutorial to properly set up Conversion Trackers in your […]
Good & Very use full
[…] To get some more information on conversion tracking refer to the OpenX Source / Revive Adserver Conversion Tracking tutorial. […]
Why is it that Revive is not capturing the country, browser, and os statistics during logging or reporting? The DB fields are there but I find no data. Maxmind provides the geo data, and phpsniff provides the OS and browser. Am I missing something?
This seems to be for tracking banners on your own website that lead to pages / actions also on your own website. What about tracking banners delivered on your website for visits / actions on the advertisers website? Or tracking visits / actions on your own site resulting from clicks on banners delivered on other websites?
Will the tracking tags work even if it is placed within a secure site? (https://) Or do you need to modify the tag?
Should work with https as well.
This looks good, but I don’t really understand why you’d need this? Most ad networks provide conversion tracking utilities anyway?
Hello everybody!
I would like to do the same but to tracking links from Zanox, not for banners like here.
Can someone help me with it?